The new Briskine Sidebar puts your templates in a side panel that stays open, so you can insert several in a row without reopening the dialog each time. It's also the first way to insert templates directly into Google Docs.
The Briskine Dialog closes as soon as you insert a template, so filling out a longer email or replying to several messages in a row means reopening it every time.
The Sidebar stays open on the side of your browser window, so you can pick a template, then pick the next one without closing anything in between. Because it's a native browser panel rather than something tied to a single page, it follows you across tabs, and works with Chrome's split view if you're working in two tabs side by side.
How to open the Sidebar
Right-click anywhere on the page and choose Briskine → Open sidebar.
If you're on a Chromium-based browser, like Chrome, Brave, or Edge, you can also right-click the Briskine icon in your toolbar and select Open side panel.
Once it's open, focus the text field you want to fill in, then select a template in the Sidebar to insert it. You can browse and search your templates the same way you would in the dialog.
The Sidebar is resizable, so you can make it wider to see more of your templates at a glance. It's available alongside the Dialog and Bubble everywhere Briskine already works.
Google Docs support
We've had requests for Google Docs support for a while. Because the Sidebar is a native browser panel, it works in Google Docs too, where the Dialog and Bubble aren't available.
Open a Google Doc, bring up the Sidebar, and insert templates into your document the same way you would anywhere else.
The new Cursor helper lets you automatically position the text cursor anywhere in your text after inserting a template.
Briskine can now place the cursor exactly where you need to fill in details, so you no longer need to manually click through the template.
By default, when you insert a Briskine template, the text cursor lands at the end of the inserted text. This works for most templates, but it's not ideal when you need to fill in a specific detail in the middle of a long message. Cursors are designed to save you those extra clicks and keep your hands on the keyboard.
How to use the Cursor helper
To set the starting position of your cursor, just add the {{cursor}} helper to your template.
For example, if you have a template for scheduling a meeting, you can place the cursor exactly where the time should go:
When you insert this template, Briskine will automatically place the cursor right after "at", so you can type the time and hit send immediately.
Support for multiple cursors and placeholders
If you need to fill in multiple fields, you can use more than one cursor in a single template. You can navigate between them by pressing ⇥ Tab to jump to the next position, or ⇧ Shift + ⇥ Tab to go back.
You can also add placeholders to your cursors to make it clear what needs to be filled in:
When you reach a cursor with a placeholder, the text inside will be automatically selected. Just start typing to replace it.
Conditional cursors for smarter workflows
Because the cursor is a template helper, you can even use it inside conditional logic. This is great for making sure you don't forget to fill in a name if a variable is missing:
Hello{{orto.first_name(cursor"NAME")}},
If the recipient’s first name is available, Briskine will insert it. If not, it will insert a cursor with the NAME placeholder so you can fill it in manually.
The new cursor feature works in text areas, input fields, and rich-text editors across all websites, including Gmail, Outlook.com, and LinkedIn.
The Briskine Bubble now works on any website — including help desks, CMS platforms, and internal dashboards.
The bubble is a small floating button that appears on top of text fields and lets you quickly open the Briskine Dialog.
Until now, it only appeared automatically in Gmail, Outlook, and LinkedIn — the most popular places our users write emails and messages. But we know your work extends beyond those apps. Whether you're handling support tickets, filling out web forms, or collaborating in tools like JIRA, Gorgias, or Intercom, you need your templates readily available.
Starting today, you can enable the bubble wherever you need it.
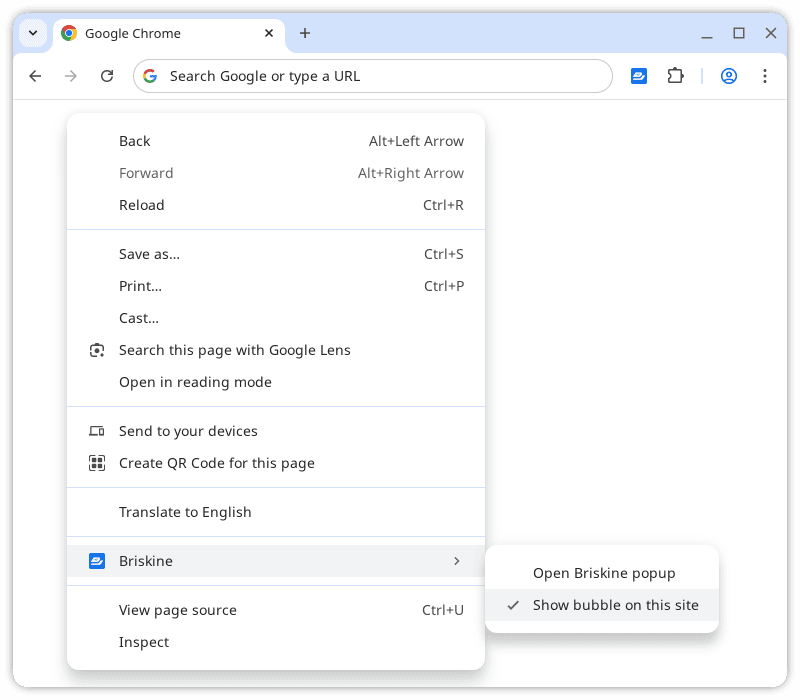
How to enable the Briskine Bubble on any site:
Go to the website where you want the bubble to appear.
Right-click anywhere on the page.
Choose Briskine → Show bubble on this site.
Once enabled, the bubble will appear in the top-right corner of any large text box on that site.
Find more details about the bubble and the dialog in our Help Center.
You can now assign multiple administrators to your Briskine team, making it easier to share management responsibilities and keep your team organized.
Previously, only the person who originally created the team and upgraded to the premium plan had admin access. That meant just one person could manage the subscription and make changes to the team. With this update, you can now give admin rights to others on your team, making it easier to share responsibility.
Administrators can manage team members, upgrade or modify the subscription, and assign or revoke admin access. You can have as many administrators as your team needs.
To make someone an administrator, go to the Team page, click the three-dot menu next to their name, and press Make administrator. If you need to remove admin rights later, you can follow the same steps and choose Revoke administrator.
This update is especially useful for larger teams or when the original admin isn't available. It gives your team more flexibility and helps keep things running smoothly.
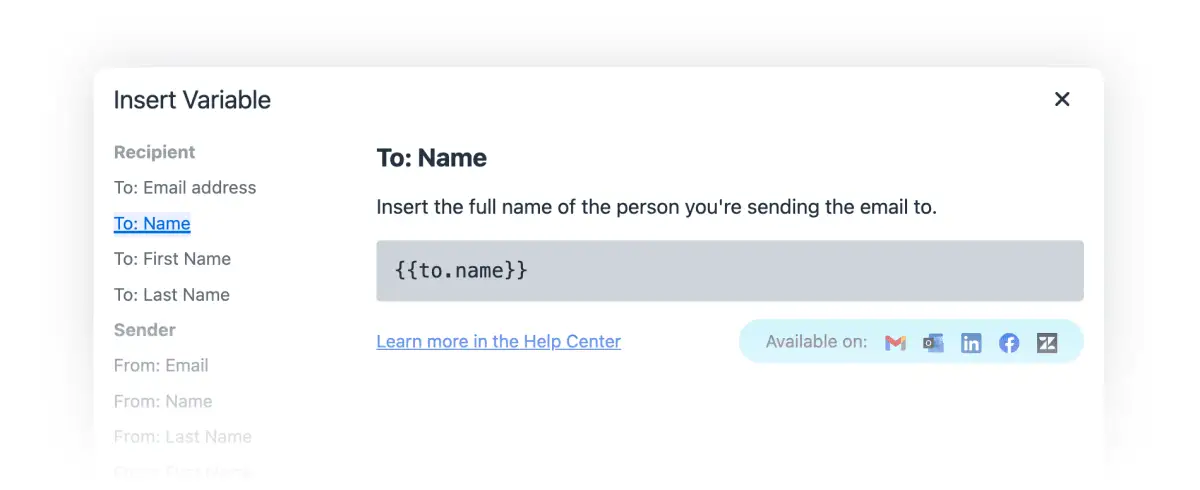
Briskine lets you add dynamic content to templates by using variables, helpers, and partials. Instead of manually typing in details like names or dates, Briskine inserts them automatically, saving time and reducing errors.
Using variables for personalized messages
Variables act as placeholders in templates and are replaced with real-time data when inserted. For example, {{to.first_name}} automatically adds the recipient's first name in emails or messages. Other available variables include the sender’s name, CC or BCC recipients, email addresses, and email subjects. These variables maintain a personal tone while reducing manual input.
To prevent missing names, the {{or}} helper sets a fallback value.
Writing Hi {{or to.first_name "there"}}, ensures the greeting always includes a name or a default word. This will make sure there are no awkward gaps in messages, such as "Hi ," instead of a properly formatted greeting.
The {{moment}} helper automatically inserts dates and times. It can add the current date, calculate a future or past date, or specify the next occurrence of a particular day. This is useful for setting deadlines, scheduling follow-ups, or creating end dates for offers.
For example, {{moment add="7;days"}} inserts the date seven days from now, which helps with reminders or meeting confirmations. Meanwhile, {{moment add="1;week" isoWeekday="Monday"}} retrieves the next Monday's date, making scheduling easier.
By default, dynamic dates follow your device's date format and time zone settings, but you can override them for specific templates if needed. For example, {{moment locale="fr"}} inserts the current date in French.
Text helpers format text, extract key information, or replace characters. This can guarantee proper capitalization, or pull details like domain names from email addresses.
{{capitalizeAll to.name}} capitalizes first and last names correctly, even if entered in all lowercase.
{{lookup (text to.email "split" "@") 1}} extracts the domain from an email address, making it easy to identify a contact’s company or service provider.
Conditional helpers adjust content based on available data, time of day, or other factors. They can personalize greetings based on when an email is written or adjust responses depending on whether a recipient's name is available.
The {{or}} helper can make sure a value is always present, preventing blank spaces or missing details in messages.
For example, combining a conditional if with the {{compare}} and {{moment}} helpers, you can use a different greeting depending on when you're writing the message, with:
Partials simplify template management by reusing pre-written content, making updates easier and keeping messages consistent.
Instead of rewriting the same details repeatedly, you can store commonly used text as a separate template and reference it in others. A company address, for example, can be stored separately and inserted with {{> address}} in multiple templates. Updating the main address template automatically updates all instances where it appears.
Partials are useful for email signatures, phone numbers, disclaimers, or any frequently repeated information. If company contact details change, updating the main template will keep all templates accurate without requiring individual updates.
To quickly add commonly used variables and dynamic elements, press the 💎 Variables button in the Briskine template editor.
Briskine's dynamic content features will ultimately save you time and effort. Whether inserting names, dates, or frequently used text, they help create personalized content with less effort. Templates automatically adapt to the context, so you won't have to make manual adjustments once they're inserted.
For more details and examples of using dynamic content, visit the Briskine Help Center.